Protecting an API using Client Credentials
The following Identity Server 4 quickstart provides step by step instructions for various common IdentityServer scenarios. These start with the absolute basics and become more complex as they progress. We recommend that you follow them in sequence. To see the full list, please go to IdentityServer4 Quickstarts Overview
This is quickstart number one it presents the most basic scenario for protecting APIs using IdentityServer 4. In this quickstart you define an API and a Client with which to access it. The client will request an access token from the Identity Server by providing a ClientCredentials which acts as a secret known to both the client and identity server and it will use the token to gain access to the API.
Source Code
As with all of these quickstarts you can find the source code for it in the IdentityServer4 repository. The project for this quickstart is Quickstart #1: Securing an API using Client Credentials
Preparation
In order to make following these quickstarts easier for you the team has created some custom templates for dotnet new.
To install the custom templates open a console window and type the following command:
dotnet new -i IdentityServer4.Templates::2.6.1
They will be used as a starting point for the various tutorials.
Setting up the ASP.NET Core application
First create a directory for the application - then use our template to create an ASP.NET Core application that includes a basic IdentityServer setup, e.g.:
md quickstart
cd quickstart

md src
cd src

dotnet new is4empty -n IdentityServer
This will create the following files:
IdentityServer.csproj- the project file and aProperties\launchSettings.jsonfileProgram.csandStartup.cs- the main application entry pointConfig.cs- IdentityServer resources and clients configuration file
You can now use your favorite text editor to edit or view the files. If you want to have Visual Studio support, you can add a solution file like this:
cd ..
dotnet new sln -n Quickstart
and let it add your IdentityServer project (keep this command in mind as we will create other projects below):
dotnet sln add .\src\IdentityServer\IdentityServer.csproj
Note
The protocol used in this Template is http and the port is set to 5000 when running on Kestrel or a random one on IISExpress. You can change that in the Properties\launchSettings.json file. However, all of the quickstart instructions will assume you use the default port on Kestrel as well as the http protocol, which is sufficient for local development. You should not run identity server http in a production enviroment http should only be used for testing.
Defining an API Resource
An API is a resource in your system that you want to protect. Resource definitions can be loaded in many ways, the template you used to create the project above shows how to use a “code as configuration” approach.
Open the project that we just created above in your favorite editor. Find the Config.cs file you can find a method called GetApis, define the API as follows:
public static IEnumerable<ApiResource> GetApis()
{
    return new List<ApiResource>
    {
        new ApiResource("api1", "My API")
    };
}
Note
If you will be using this in production it is important to give your API a logical name. Developers will be using this to connect to your api though your Identity server. It should describe your api in simple terms to both developers and users.
A good example would be:
new ApiResource("afcpayroll", "Acme Fireworks Co. payroll")
A bad example would be:
new ApiResource("testapi", "My first api")
Defining the client
The next step is to define a client application that we will use to access our new API.
For this scenario, the client will not have an interactive user, and will authenticate using the so called client secret with IdentityServer.
Once again open the Config.cs file and add the following code to it:
public static IEnumerable<Client> GetClients()
{
    return new List<Client>
    {
        new Client
        {
            ClientId = "client",

            // no interactive user, use the clientid/secret for authentication
            AllowedGrantTypes = GrantTypes.ClientCredentials,

            // secret for authentication
            ClientSecrets =
            {
                new Secret("secret".Sha256())
            },

            // scopes that client has access to
            AllowedScopes = { "api1" }
        }
    };
}
You can think of the ClientId and the ClientSecret as the login and password for your application itself. It identifies your application to the identity server so that it knows which application is trying to connect to it.
Configuring IdentityServer
Loading the resource and client definitions happens in Startup.cs - the template already does this for you:
public void ConfigureServices(IServiceCollection services)
{
    var builder = services.AddIdentityServer()
        .AddInMemoryIdentityResources(Config.GetIdentityResources())
        .AddInMemoryApiResources(Config.GetApis())
        .AddInMemoryClients(Config.GetClients());

    // omitted for brevity
}
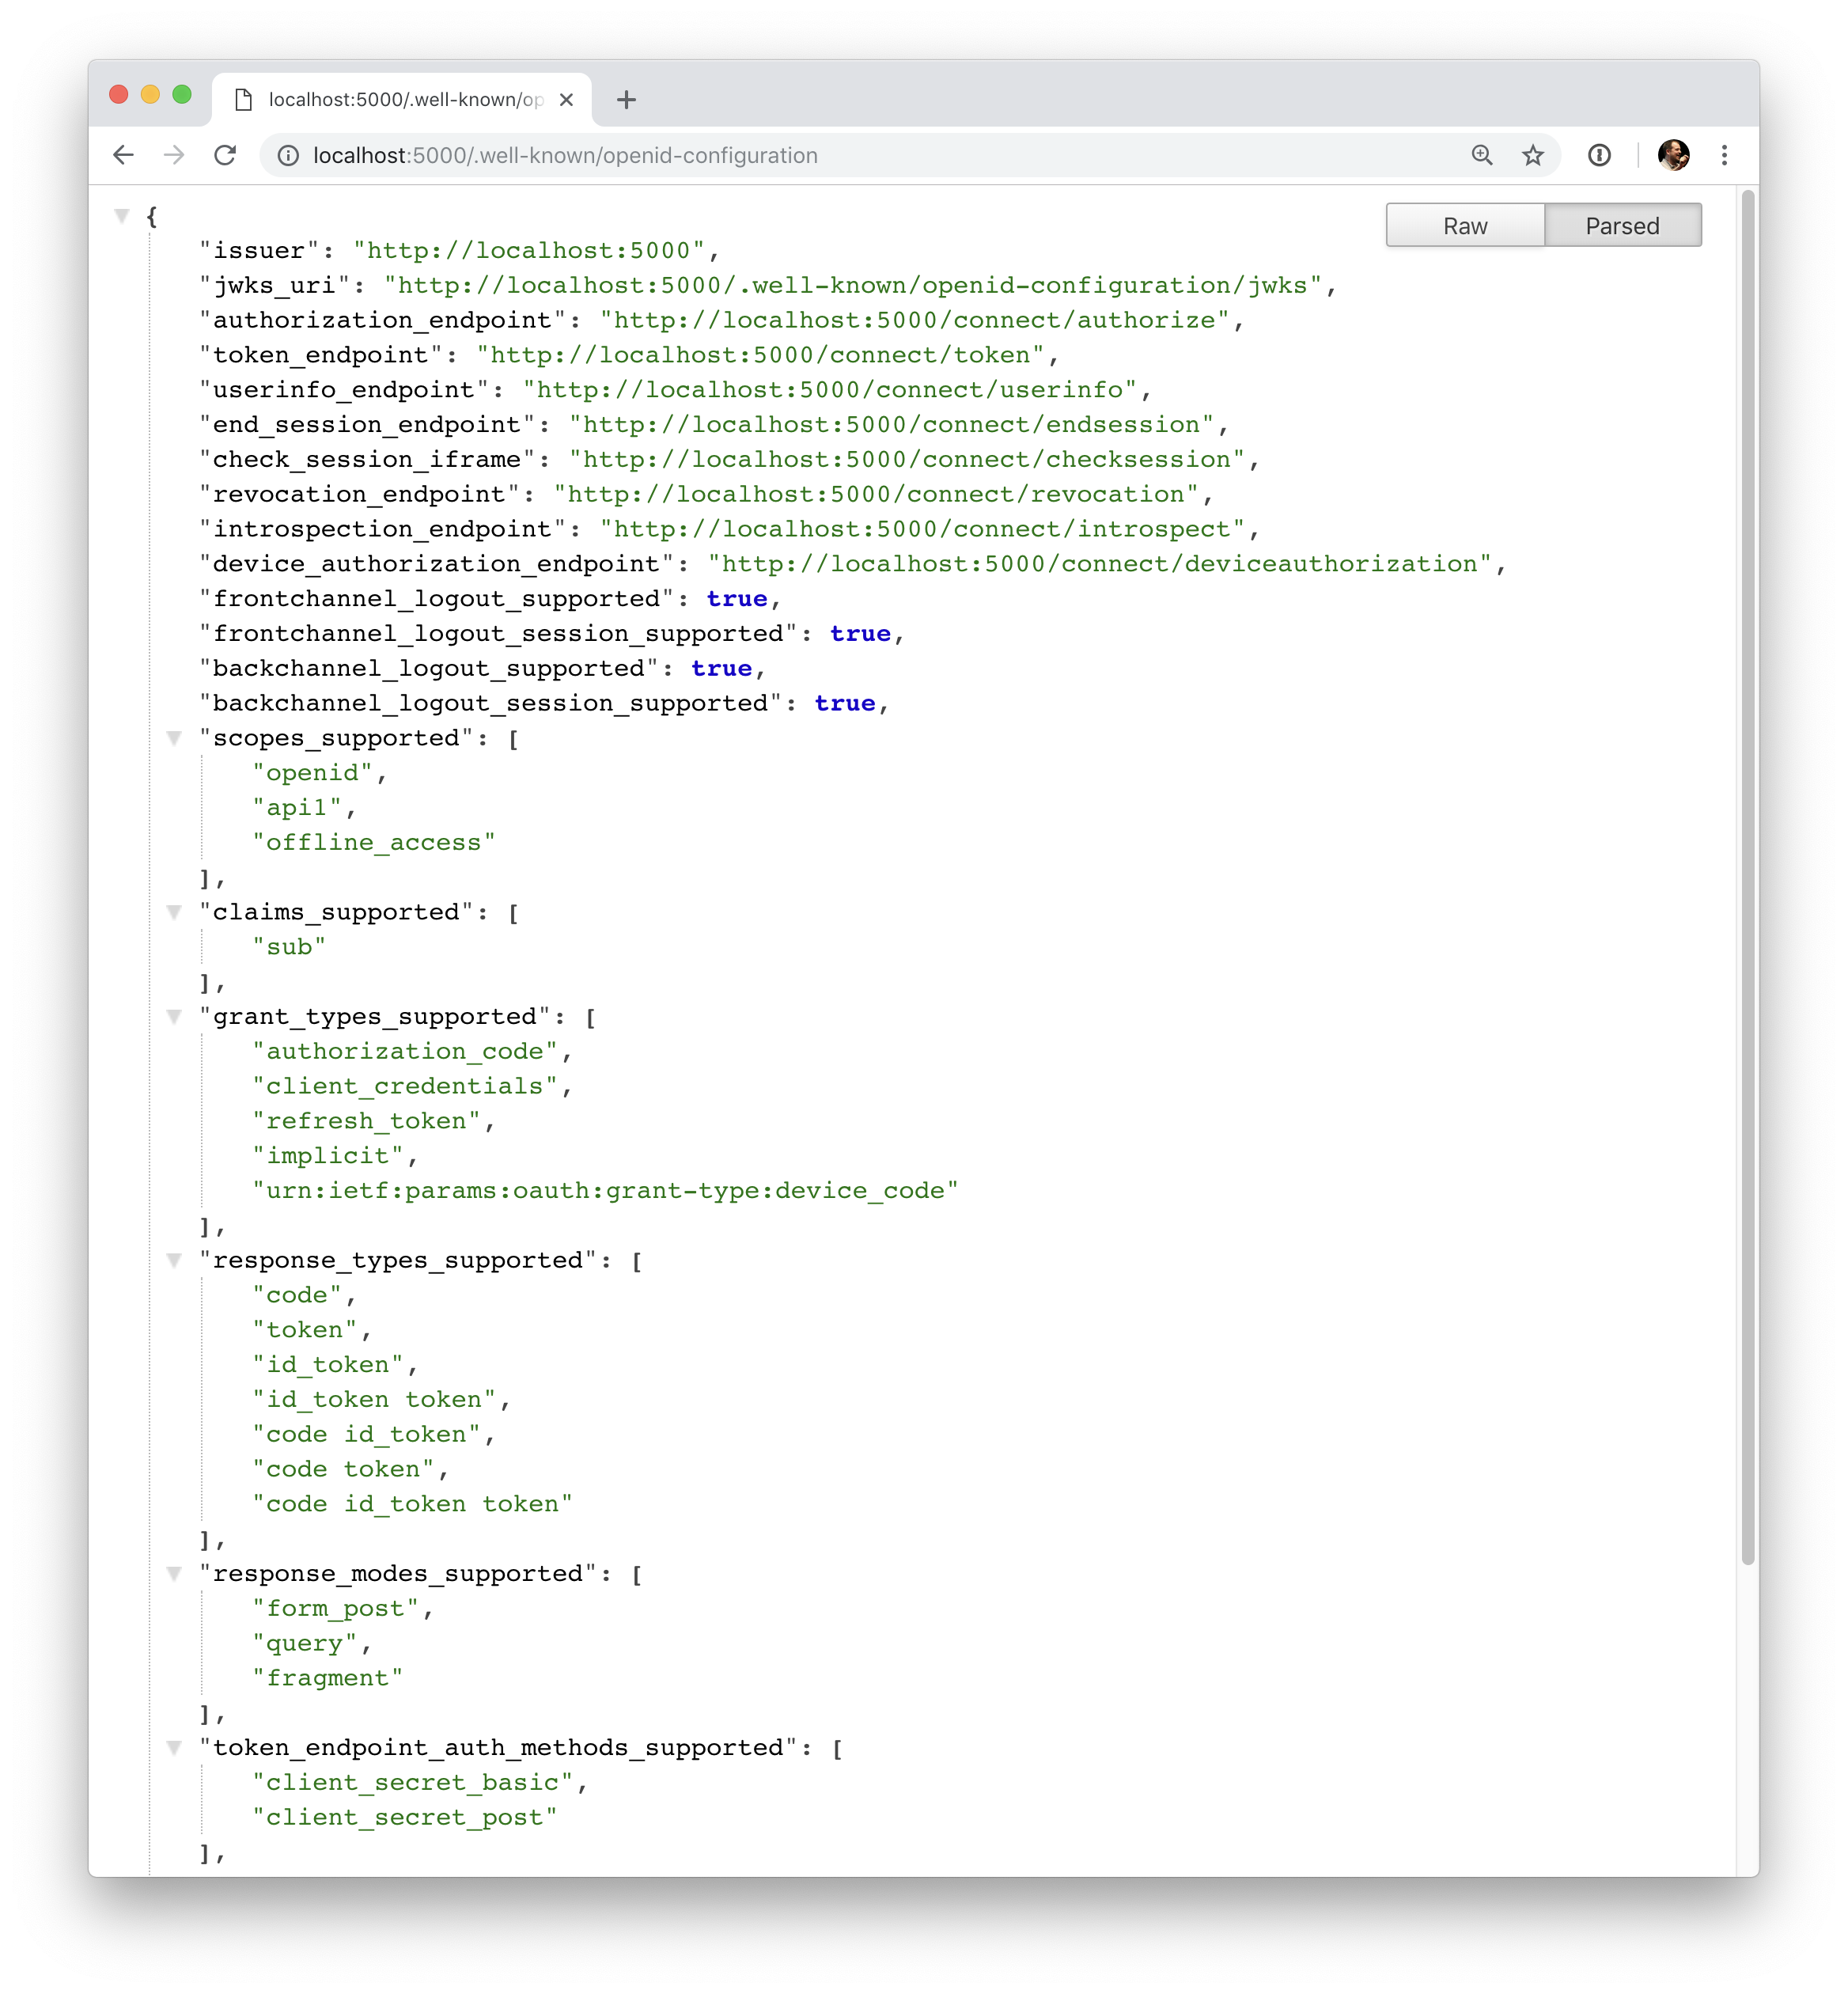
That’s it your identity server should now be configured. If you run the server and navigate the browser to http://localhost:5000/.well-known/openid-configuration, you should see the so-called discovery document.
The discovery document is a standard endpoint in identity servers. The discovery document will be used by your clients and APIs to download the necessary configuration data.
At first startup, IdentityServer will create a developer signing key for you, it’s a file called tempkey.rsa.
You don’t have to check that file into your source control, it will be re-created if it is not present.
Adding an API
Next, add an API to your solution.
You can either use the ASP.NET Core Web API (or empty) template from Visual Studio or use the .NET CLI to create the API project as we do here.
Run from within the src folder the following command:
dotnet new web -n Api
Then add it to the solution by running the following commands:
cd ..
dotnet sln add .\src\Api\Api.csproj
Configure the API application to run on http://localhost:5001 only. You can do this by editing the launchSettings.json file inside the Properties folder. Change the application URL setting to be:
"applicationUrl": "http://localhost:5001"
The controller
Add a new folder Controllers and a new controller IdentityController (note: if you are using Visual Studio select API controller empty>`_ to your API project:
[Route("identity")]
[Authorize]
public class IdentityController : ControllerBase
{
    [HttpGet]
    public IActionResult Get()
    {
        return new JsonResult(from c in User.Claims select new { c.Type, c.Value });
    }
}
This controller will be used later to test the authorization requirement, as well as visualize the claims identity through the eyes of the API.
Configuration
The last step is to add the authentication services to DI (dependency injection) and the authentication middleware to the pipeline. These will:
- validate the incoming token to make sure it is coming from a trusted issuer
- validate that the token is valid to be used with this api (aka audience)
Update Startup to look like this:
public class Startup
{
    public void ConfigureServices(IServiceCollection services)
    {
        services.AddMvcCore()
            .AddAuthorization()
            .AddJsonFormatters();

        services.AddAuthentication("Bearer")
            .AddJwtBearer("Bearer", options =>
            {
                options.Authority = "http://localhost:5000";
                options.RequireHttpsMetadata = false;

                options.Audience = "api1";
            });
    }

    public void Configure(IApplicationBuilder app)
    {
        app.UseAuthentication();

        app.UseMvc();
    }
}
AddAuthentication adds the authentication services to DI and configures "Bearer" as the default scheme.
UseAuthentication adds the authentication middleware to the pipeline so authentication will be performed automatically on every call into the host.
Navigating to the controller http://localhost:5001/identity on a browser should return a 401 status code. This means your API requires a credential and is now protected by IdentityServer.
Creating the client
The last step is to write a client that requests an access token, and then uses this token to access the API. For that, add a console project to your solution, remember to create it in the src:
dotnet new console -n Client
Then as before, add it to your solution using:
cd ..
dotnet sln add .\src\Client\Client.csproj
Open up Program.cs and copy the content from here to it..
The client program invokes the Main method asynchronously in order to run asynchronous http calls. This feature is possible since C# 7.1 and will be available once you edit Client.csproj to add the following line as a PropertyGroup:
<LangVersion>latest</LangVersion>
The token endpoint at IdentityServer implements the OAuth 2.0 protocol, and you could use raw HTTP to access it. However, we have a client library called IdentityModel, that encapsulates the protocol interaction in an easy to use API.
Add the IdentityModel NuGet package to your client. This can be done either via Visual Studio’s Nuget Package manager or though the package manager Console with the following command:
Install-Package IdentityModel
or by using the CLI:
dotnet add package IdentityModel
IdentityModel includes a client library to use with the discovery endpoint. This way you only need to know the base-address of IdentityServer - the actual endpoint addresses can be read from the metadata:
// discover endpoints from metadata
var client = new HttpClient();
var disco = await client.GetDiscoveryDocumentAsync("http://localhost:5000");
if (disco.IsError)
{
    Console.WriteLine(disco.Error);
    return;
}
Next you can use the information from the discovery document to request a token to IdentityServer to access api1:
// request token
var tokenResponse = await client.RequestClientCredentialsTokenAsync(new ClientCredentialsTokenRequest
{
Address = disco.TokenEndpoint,
ClientId = "client",
ClientSecret = "secret",
Scope = "api1"
});
if (tokenResponse.IsError)
{
Console.WriteLine(tokenResponse.Error);
return;
}
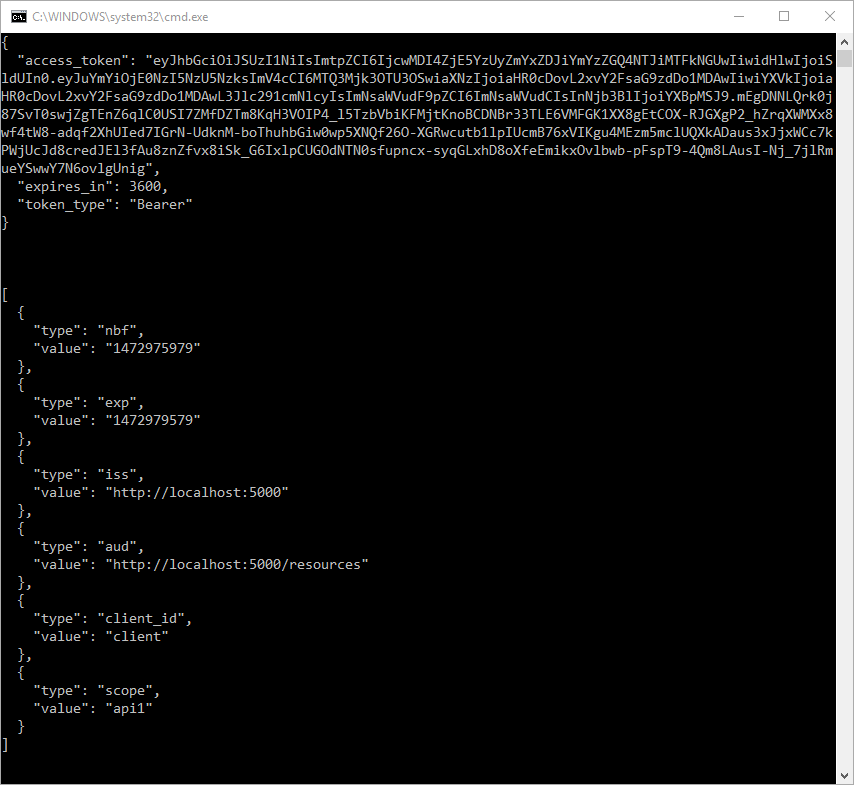
Console.WriteLine(tokenResponse.Json);
Note
Copy and paste the access token from the console to jwt.io to inspect the raw token.
Calling the API
To send the access token to the API you typically use the HTTP Authorization header. This is done using the SetBearerToken extension method:
// call api
var client = new HttpClient();
client.SetBearerToken(tokenResponse.AccessToken);

var response = await client.GetAsync("http://localhost:5001/identity");
if (!response.IsSuccessStatusCode)
{
    Console.WriteLine(response.StatusCode);
}
else
{
    var content = await response.Content.ReadAsStringAsync();
    Console.WriteLine(JArray.Parse(content));
}
The output should look like this:
Note
By default an access token will contain claims about the scope, lifetime (nbf and exp), the client ID (client_id) and the issuer name (iss).
Further experiments
This walkthrough focused on the success path so far
- client was able to request token
- client could use the token to access the API
You can now try to provoke errors to learn how the system behaves, e.g.
- try to connect to IdentityServer when it is not running (unavailable)
- try to use an invalid client id or secret to request the token
- try to ask for an invalid scope during the token request
- try to call the API when it is not running (unavailable)
- don’t send the token to the API
- configure the API to require a different scope than the one in the token